Introduction
Walk into any engineering office or design studio today, and you'll likely hear the hum of an FDM 3D printer at work. This technology, short for Fused Deposition Modeling, has become the workhorse of the prototyping world. But here's the thing: FDM isn't just for making rough concept models anymore. At Yigu technology, we've watched this technology evolve from a hobbyist's toy into a sophisticated manufacturing tool that's changing how products get made.
So what makes FDM special? Simply put, it builds objects by melting plastic filament and depositing it layer by layer, like a precision hot glue gun on steroids. But the innovation isn't just in the printing process itself. It's in how engineers, doctors, artists, and educators are using this technology to solve real problems. In this article, we'll explore the mechanics, applications, and future of FDM 3D printing, and show you why it's becoming indispensable across so many fields.
Part 1: What Exactly Happens Inside an FDM Printer?
How Does the Printer Turn Plastic into Products?
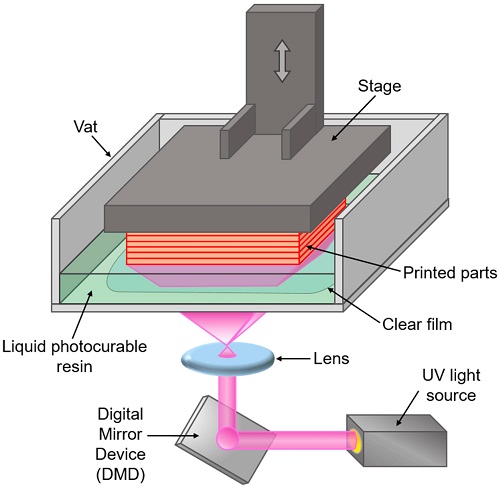
The process starts with a digital file. You design your part in CAD software, save it, and feed it to the printer. But between that file and the finished object, several things happen in precise sequence.
First, slicing software takes your 3D model and cuts it into hundreds of thin horizontal layers. Think of it like a CT scan in reverse: instead of scanning a object to create slices, you're taking slices to build an object. Each layer becomes a instruction path for the printer.
Then the real action begins. The printer heats its nozzle to the right temperature for your chosen material. For PLA, that's around 200°C. For ABS, closer to 240°C. The filament feeds into this hot end, melts, and gets pushed out through a tiny opening. The nozzle moves in the X and Y axes, drawing each layer like a pen on paper. When one layer finishes, the build platform drops down by exactly one layer height, and the next layer begins.
Here's a quick breakdown of the key steps:
- Design creation in CAD or from 3D scanning
- Slicing into printable layers
- Heating the filament to melting point
- Extrusion through a moving nozzle
- Cooling and solidification of each layer
- Platform movement for the next layer
- Repeat until the object is complete
What Parts Make an FDM Printer Work?
Understanding the components helps you appreciate what can go wrong and how to fix it. Every FDM printer has five critical systems:
The Nozzle - This tiny metal tip determines your print's detail level. Common sizes range from 0.2mm for fine details to 0.8mm for fast, rough prints. We once had a client printing miniature gears for a robotics project. Switching from a standard 0.4mm nozzle to a 0.2mm one made the teeth mesh perfectly. The tradeoff? Print time tripled.
The Extruder - This is the feeding mechanism. Two main types exist:
- Direct drive: Motor sits right above the nozzle. Better for flexible filaments, more precise control.
- Bowden: Motor sits on the frame, pushes filament through a tube. Lighter print head, faster movements possible.
The Print Bed - The foundation matters. A warped or unlevel bed ruins prints. Most quality printers use heated beds with special surfaces like PEI sheets or removable magnetic platforms. Temperature control here prevents warping, especially with materials like ABS that shrink as they cool.
The Motion System - Stepper motors move the nozzle and bed with incredible precision. Typical resolution is 0.01mm or better. That's finer than a human hair.
The Control Board - This runs everything. It reads the G-code, controls temperatures, coordinates movements, and monitors sensors. Advanced boards even handle automatic bed leveling and filament runout detection.
How Does Material Feed and Melt Properly?
Getting the filament from the spool to the nozzle sounds simple, but it's surprisingly delicate. The extruder gears must grip firmly without chewing into the plastic. Too loose, and the filament slips. Too tight, and it grinds away, creating dust that clogs everything.
Once inside the hot end, the filament hits what's called the melt zone. This section must maintain exact temperature. If it's too cold, the filament won't flow smoothly, causing under-extrusion and weak layer bonds. Too hot, and the plastic becomes runny, leading to blobs, strings, and lost detail.
Different materials need different handling:
- PLA flows easily, prints at lower temperatures, and doesn't need a heated bed
- ABS requires higher temperatures and a hot bed to prevent warping
- PETG sits in between, but tends to string if too hot
- Flexible filaments need direct drive extruders with constrained paths
We learned this the hard way with a medical device client. They wanted flexible TPU parts for a wearable sensor. Our standard Bowden printer couldn't push the soft filament without buckling. Switching to a direct drive extruder solved it immediately.
Part 2: Why Is FDM Becoming Everyone's Go-To Technology?
What Makes FDM Different from Other 3D Printing Methods?
FDM dominates the market for good reasons. It's accessible, versatile, and constantly improving. But how does it stack up against other technologies? Here's a comparison table we use at Yigu technology when helping clients choose:
| Technology | FDM | SLA | SLS |
|---|---|---|---|
| Material Form | Filament | Liquid resin | Powder |
| Typical Cost | Low to medium | Medium to high | High |
| Surface Finish | Layer lines visible | Smooth | Slightly rough, grainy |
| Strength | Good (varies by material) | Moderate | Excellent |
| Support Structures | Often needed | Always needed | Not needed |
| Ease of Use | Very easy | Moderate | Complex |
| Common Applications | Prototypes, jigs, fixtures | Dental, jewelry, detailed models | Functional parts, end-use products |
The key advantage FDM holds is cost and simplicity. A decent desktop FDM printer costs less than a good laptop. Materials are inexpensive and widely available. And almost anyone can learn to use one in a few hours.
What Are the Biggest Limitations Engineers Face?
No technology is perfect. FDM has real constraints that matter in professional settings:
Layer adhesion weakness - Parts are strongest in the X and Y directions, but weaker in Z. That means a hook printed sideways holds weight better than one printed upright. Smart designers orient parts to put stress across layers, not between them.
Surface finish - Those layer lines everyone recognizes? They're not just cosmetic. They can trap dirt, create stress risers, and make parts look unprofessional without post-processing.
Speed versus quality tradeoff - Fine details need thin layers, which means long print times. A part taking 4 hours at 0.2mm layer height might take 16 hours at 0.05mm.
Material limitations - While FDM materials have improved dramatically, you still can't match the properties of injection-molded or machined parts in every way. High-temperature engineering plastics need specialized printers.
We worked with an aerospace client who needed flame-retardant parts for cabin interiors. Standard FDM materials wouldn't pass certification. We had to use a specialized PEEK printer that cost 10 times more than our usual machines. Sometimes, FDM isn't the answer.
Part 3: Where Is FDM Making the Biggest Impact Today?
How Is Manufacturing Using FDM Differently Now?
Manufacturing has embraced FDM in three distinct ways:
Rapid prototyping remains the biggest use. Companies cut development time by 30-50% compared to traditional methods. A automotive supplier we work with used to wait 6 weeks for injection-molded prototype parts. Now they print functional prototypes in 2 days, test them, revise, and print again. Their last project went from concept to production in 4 months instead of 12.
Tooling and fixtures represent a growing application. Factories need jigs to hold parts during assembly, fixtures for quality checks, and guides for drilling. These used to be machined from metal or plastic, taking weeks and costing hundreds each. Now, workers design and print custom tools overnight. One electronics manufacturer saved $47,000 in one year by printing their own assembly guides.
Low-volume production fills the gap between prototyping and mass manufacturing. Need 50 parts? 200? 1000? For quantities below the injection molding break-even point, FDM makes economic sense. No tooling costs, no inventory, just print what you need when you need it.
What's Happening in Healthcare and Education?
The medical field has embraced FDM for patient-specific solutions. Surgeons at a children's hospital we partner with now print heart models before complex surgeries. They practice on exact replicas of the patient's anatomy, reducing operating time by an average of 25%. For one newborn with a rare heart defect, the printed model let the surgical team plan an approach that saved hours on the table.
Custom prosthetics and orthotics have become another sweet spot. Traditional prosthetic sockets take days to make and require multiple fittings. With 3D scanning and FDM printing, clinics can scan a patient's residual limb, design a socket, and print it overnight. The patient comes back the next day for fitting. Adjustments? Scan again, modify, print again.
In education, FDM printers have become standard equipment in STEM programs. Students learn design thinking by creating and testing their own parts. A high school robotics team we sponsored went from struggling to find replacement gears to designing and printing custom gearboxes optimized for their robot. They won regionals that year.
How Are Artists and Designers Pushing Boundaries?
The creative world has embraced FDM's limitations as features. Artists like Joshua Harker create intricate sculptures that would be impossible to make any other way. His work exploits FDM's ability to create complex, interlocking forms that traditional sculpting couldn't achieve.
Fashion designers are experimenting with 3D printed textiles. By designing flexible, chainmail-like patterns, they create garments that flex and move while maintaining structure. One designer we know printed an entire dress using flexible TPU filament. It weighed less than a kilogram and took 300 hours of print time.
Product designers use FDM for ergonomic testing. Before committing to expensive molding tools, they print multiple handle shapes, test them with real users, and refine based on feedback. A kitchen tool manufacturer went through 14 handle iterations before finding the perfect grip. Each iteration cost materials and time, but no tooling changes. The final product won a design award.
Part 4: What's Coming Next for FDM Technology?
How Will Materials Continue to Evolve?
The biggest innovations in FDM are happening in materials science. Engineers are developing filaments with amazing new properties:
Carbon fiber reinforced filaments now offer strength approaching aluminum at a fraction of the weight. A drone manufacturer switched to carbon fiber nylon for their frames. Weight dropped 40%, flight time increased 25%.
Conductive filaments let designers embed circuits directly into printed parts. Imagine a prosthetic hand with sensors printed right into the fingertips. No wiring, no assembly, just print and connect.
Wood, metal, and ceramic filled filaments combine the look of traditional materials with the flexibility of 3D printing. Artists create sculptures that look and feel like carved wood but with internal structures impossible to carve.
Biodegradable and bio-based materials address sustainability concerns. New PLA formulations compost in industrial facilities. Other materials derive from algae, corn waste, or recycled plastic bottles.
What Machine Improvements Are Coming?
Printer hardware isn't standing still either. Several trends will shape the next generation:
Multi-material printing is becoming standard. Dual extruders let you print dissolvable supports alongside your part, eliminating difficult support removal. Some printers now handle four or more materials in a single print.
Faster print speeds through better motion systems. Belt-driven gantries, lightweight print heads, and optimized kinematics cut print times by 50% or more. Some industrial FDM printers now rival injection molding speeds for certain geometries.
Larger build volumes at lower prices. Desktop printers that once handled 200mm cubes now manage 500mm or more. Industrial machines print parts over 1 meter long, opening new applications in furniture, automotive, and construction.
Smarter software with AI-driven error detection. Cameras watch prints, detect failures early, and either pause or adjust settings to save the print. Machine learning algorithms optimize print settings based on geometry and material.
How Will FDM Integrate with Other Technologies?
The future isn't just better printers. It's better workflows that combine multiple technologies:
3D scanning plus FDM printing creates reverse engineering workflows. Scan an existing part, modify it digitally, print the improved version. A restoration company uses this to reproduce discontinued parts for vintage cars. Scan a broken bracket, repair it digitally, print a perfect replacement.
CNC machining plus FDM combines additive and subtractive. Print a part near net shape, then machine critical surfaces to tight tolerances. This hybrid approach gives you the geometric freedom of printing with the precision of machining.
Robotic arms with FDM heads print without build volume limits. Need a 3-meter sculpture? A robot arm on a track can print it. Construction companies are experimenting with printing building components directly on site.
Conclusion
FDM 3D printing has come a long way from its early days as a curiosity for tech enthusiasts. Today, it's a legitimate manufacturing technology used by Fortune 500 companies, cutting-edge hospitals, innovative schools, and creative studios worldwide. The layer-by-layer approach that seemed slow and limited now enables designs and solutions that traditional methods can't match.
At Yigu technology, we've seen FDM transform how our clients work. Product development cycles have compressed from months to weeks. Custom medical devices now fit patients perfectly. Manufacturing lines run more efficiently with printed tooling. Students learn faster by holding their designs in their hands.
The innovation isn't stopping. Better materials, faster machines, and smarter software will keep expanding what's possible. FDM isn't just prototyping anymore. It's production. It's healthcare. It's art. And it's only getting started.
FAQ
Q1: What's the strongest material I can use in a standard FDM printer?
A1: For most desktop printers, polycarbonate or nylon offer the best strength. Polycarbonate is extremely tough and impact-resistant but prints at high temperatures (260-300°C). Nylon is strong and flexible, great for functional parts. If your printer can handle it, carbon fiber reinforced nylon gives the best strength-to-weight ratio.
Q2: How accurate are FDM printed parts?
A2: Typical desktop FDM printers achieve ±0.2mm accuracy for well-tuned machines. Industrial FDM printers reach ±0.05mm or better. Factors affecting accuracy include temperature stability, material shrinkage, and printer calibration. For critical dimensions, design with tolerances of 0.3-0.5mm to be safe.
Q3: Can FDM printers use multiple colors in one print?
A3: Yes, but it requires either a multi-extruder printer or a single extruder with a filament switching system. Multi-extruder printers have separate nozzles for each color but cost more. Filament switchers pause printing, retract one color, and feed another, which can leave color transition blobs.
Q4: How do I stop my prints from warping?
A4: Warping happens when cooling plastic shrinks unevenly. Solutions include: using a heated bed at the right temperature, applying adhesives like glue stick or hairspray, using a brim or raft in your slicer settings, and ensuring your print enclosure maintains stable temperature. For ABS, an enclosure is almost mandatory.
Q5: What maintenance does an FDM printer need?
A5: Regular tasks include: leveling the bed (every few prints), cleaning the nozzle (when changing materials or after clogs), lubricating linear rods and leadscrews, tightening belts if they loosen, and updating firmware occasionally. A well-maintained printer runs reliably for years.
Contact Yigu Technology for Custom Manufacturing
Ready to put FDM 3D printing to work for your next project? At Yigu technology, we combine deep engineering expertise with production-grade FDM capabilities. We don't just print parts; we help you optimize designs for manufacturability, select the right materials for your application, and scale from prototype to production seamlessly.
Our team has printed everything from aerospace brackets to medical models to custom consumer products. We know the tricks that turn a good print into a great part. Whether you need one prototype or a thousand production parts, we deliver quality, consistency, and speed.
Contact Yigu technology today for a free consultation. Let's discuss your project, explore possibilities, and build something amazing together. Visit our website, call our engineering team, or email us to start the conversation. Your next innovation is just a layer away.