You’ve picked up a bottle of standard resin, expecting it to be the “easy” entry into resin 3D printing—affordable, versatile, and perfect for your first high-detail prints. But your experience is anything but smooth: the print peels off the build plate mid-job, layers are visible even at low layer height, or the final part is so brittle it cracks when you try to remove supports. Maybe your “high-resolution” model looks fuzzy, with lost details that defeat the purpose of using resin in the first place.
Standard resin, a general-purpose photopolymer, is indeed the workhorse of resin 3D printing, but its simplicity hides nuances that trip up new users. Success depends on understanding its material overview—how its formulation affects printability—nailing the 3D printing process settings, and knowing which application areas it excels in. In this guide, we’ll break down 3D printing with standard resin, turning frustration into consistent, high-quality prints that showcase its accessibility and versatility.
Material Overview: What Makes Standard Resin Tick
Standard resin is the foundation of resin 3D printing, designed for ease of use and broad compatibility. Its material overview reveals why it’s the first choice for beginners and professionals alike:
- Base formulation: Standard resin is a UV-curable material built from a blend of monomers (small, reactive molecules) and oligomers (larger, chain-like structures) that form its solid structure when cured. Common monomer compositions include acrylics, which balance reactivity and cost, while oligomer types (often urethane acrylates) contribute to strength and flexibility. The photoinitiator content is optimized for standard UV wavelengths (385-405 nm), ensuring it cures quickly under most resin printers—critical for its reputation as user-friendly.
- Practical properties: Standard resin has a viscosity range of 500-1500 cP (thicker than water but pourable), making it easy to handle and less likely to spill than low-viscosity specialty resins. Its curing speed is fast—typically 5-20 seconds per layer—reducing print times compared to some engineering resins. Best of all, its cost-effectiveness (priced 30-50% lower than specialty resins) and widespread material availability (sold by every major 3D printing brand) make it accessible for any project, from hobbyist prints to professional prototypes.
3D Printing Process: Nailing the Settings
Standard resin works with most resin printers, but dialing in the 3D printing process settings is key to avoiding failed prints:
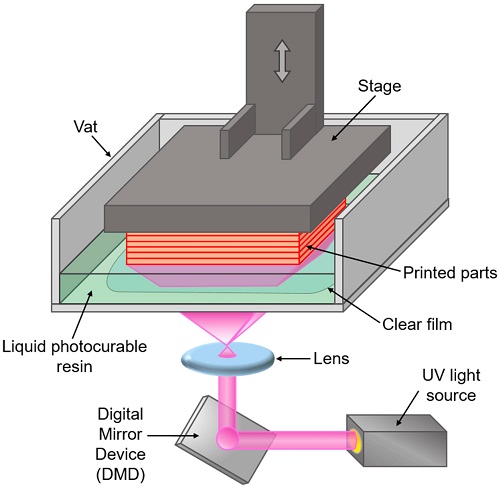
- Printer compatibility: Standard resin performs well with both Stereolithography (SLA) and Digital Light Processing (DLP) printers. SLA’s laser precision brings out fine details, while DLP’s layer-by-layer curing is faster for larger parts. Regardless of the printer, print settings should start with a layer height of 0.05-0.1 mm—a sweet spot between detail and speed. Exposure time varies by printer but typically ranges from 8-15 seconds per layer (longer for the first layer, 20-30 seconds, to ensure bed adhesion).
- Critical adjustments: UV intensity (measured in mW/cm²) should match the resin’s recommendations—too low causes under-curing (weak layers), while too high leads to over-curing (brittleness). The build platform must be level and clean; even a tiny gap can cause the first layer to peel. The resin tray should be free of debris (strain resin before use) to prevent defects. Support generation is essential for overhangs—use software defaults (small supports with 0.2-0.3 mm tips) to avoid damaging the print during removal.
- Slicing and orientation: Most slicing software compatibility is universal (Chitubox, Lychee Slicer work seamlessly). Print orientation matters—orient parts with large flat surfaces facing up to reduce warping, and angle overhangs to minimize support needs. Infill density isn’t a concern for standard resin (it prints solid by default), but surface finish optimization can be done by enabling “anti-aliasing” in slicers, which smooths edges for sharper details.
Application Areas: Where Standard Resin Shines
Standard resin’s balance of quality and affordability makes it indispensable in these application areas:
- Prototyping and design: Rapid prototyping is where standard resin excels—its ability to turn CAD files into physical parts in hours makes it ideal for testing consumer product design concepts (e.g., phone case prototypes or toy designs). Concept modeling benefits from its smooth surface, allowing designers to showcase form and function without distractions from layer lines.
- Education and visualization: Teachers and students use standard resin for educational models—anatomical replicas, molecular structures, or historical artifacts—thanks to its low cost and detail retention. Architectural visualization relies on it for scale models, capturing window details, textures, and proportions that FDM prints miss.
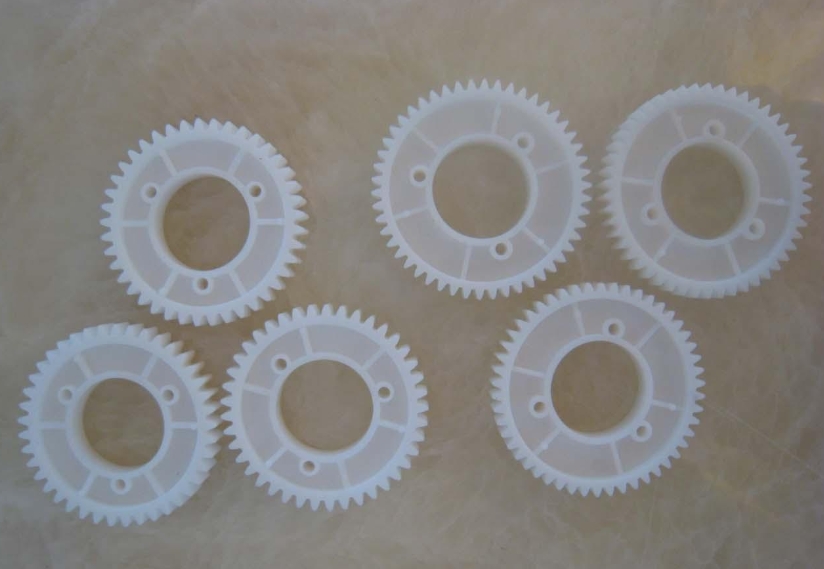
- Hobbies and art: Hobbyists love standard resin for hobbies and DIY projects—miniature figures, cosplay accessories, or custom game pieces—where its detail resolution brings characters and props to life. Artists and sculptors use it for art and sculpture, leveraging its ability to hold intricate textures and delicate features, from facial expressions to lattice patterns.
Performance Characteristics: What to Expect
Standard resin’s performance characteristics strike a balance between accessibility and quality, with some limitations to keep in mind:
- Mechanical and dimensional traits: Standard resin offers moderate mechanical properties—a tensile strength of 30-50 MPa (strong enough for non-load-bearing parts) and impact resistance that’s acceptable for prototypes but not for functional components (it’s more brittle than flexible resins). Its dimensional accuracy is impressive (±0.1 mm for parts under 100 mm), ensuring prototypes fit together as designed. Surface smoothness is a standout feature—naturally glossy with minimal layer lines, reducing post-processing needs.
- Stability and limitations: Standard resin has modest thermal stability (softens above 40-50°C), making it unsuitable for high-heat applications. Its chemical resistance is limited—it can be damaged by alcohols, solvents, or even prolonged water exposure. The shrinkage rate is 2-4% during curing, which is manageable with calibration, though warping tendency increases with large, flat parts (easily fixed with proper supports). Layer adhesion is strong when exposure times are correct, but under-cured layers separate easily.
To put it in perspective, here’s how standard resin compares to other resin types:
| Property | Standard Resin | Engineering Resin | Flexible Resin |
| Tensile Strength | 30-50 MPa | 60-80 MPa | 10-30 MPa |
| Shrinkage Rate | 2-4% | 1-3% | 3-5% |
| Cost (per kg) | $50-100 | $150-300 | $80-150 |
| Best For | Prototypes | Functional parts | Bendable parts |
Post-Processing and Finishing: Polishing Your Print
Standard resin’s post-processing is straightforward, but the right post-processing and finishing steps elevate its appearance:
- Cleaning and curing: Start by removing supports with flush cutters (take care to avoid nicks), then rinse the part in isopropyl alcohol (IPA) for 5-10 minutes to remove uncured resin. UV post-curing (5-15 minutes in a curing station) locks in strength, reducing brittleness—standard resin gains 10-20% more tensile strength after post-curing.
- Smoothing and painting: Most standard resin prints need minimal sanding—start with 400-grit sandpaper to remove support marks, then 800-grit for a polished finish. Polishing with a microfiber cloth brings out a glossy shine. Painting is easy—prime with acrylic primer (to fill tiny pores) then use acrylic or enamel paints. For extra protection, apply a clear coating (like UV-curable varnish) to resist scratches.
- Assembly and correction: Standard resin parts bond well with cyanoacrylate (superglue) or epoxy for assembly. If parts are slightly out of dimension, dimensional correction is possible with light sanding (avoid removing more than 0.1 mm to preserve details).
Yigu Technology’s Perspective: Standard Resin as a Foundation
At Yigu Technology, standard resin is our starting point for prototyping and concept models. We appreciate its cost-effectiveness and reliability—consistent results with minimal setup make it ideal for rapid prototyping and low-volume production. Our team optimizes print settings (exposure time, layer height) to balance speed and quality, ensuring clients get detailed, durable prototypes without the cost of specialty resins. For projects needing more strength or flexibility, we step up to engineering resins—but for most applications, standard resin delivers exceptional value, proving that accessibility and quality can go hand in hand.
Frequently Asked Questions (FAQ)
- Why is my standard resin print sticking to the resin tray?
This is usually due to insufficient first-layer exposure. Increase the first layer exposure time by 50-100% (e.g., from 20s to 30s) and ensure the build platform is properly calibrated to within 0.1 mm of the tray. Cleaning the tray with IPA removes cured resin residue that can block UV light.
- How can I make my standard resin print less brittle?
Brittle prints are often over-cured. Reduce layer exposure time by 10-15% or shorten post-curing by 5 minutes. Store resin in a cool, dark place—heat and light degrade it over time, increasing brittleness. For slightly more flexibility, mix 5-10% flexible resin into standard resin (test on a small print first).
- Is standard resin suitable for functional parts?
It’s limited—standard resin lacks the strength and chemical resistance for load-bearing or high-use parts. Use it for prototypes or decorative parts, but switch to engineering resin for functional components like gears or brackets. For DIY projects, it works for low-stress parts like knobs or covers.