Introduction
For decades, making injection molds meant one thing: CNC machining. Cut away metal from a solid block until the desired shape emerges. It works. It's precise. But it has limits—long lead times, geometric constraints, and cooling channels that can only be drilled in straight lines. 3D printed molds change everything. By building molds layer by layer from metal powder, you can create conformal cooling channels that follow the part's shape, reduce cycle times by 30% or more, and produce complex geometries that machining cannot achieve. This guide explains how to switch to printed molds, the technologies and materials involved, the benefits you can expect, and how to evaluate whether it's right for your operation.
Why Is 3D Printing a Game-Changer for Mold Making?
The Limitations of Traditional Mold Making
Traditional molds are machined from solid metal blocks. This method is reliable but has inherent limitations:
- Long lead times: Weeks to months from design to finished mold
- Geometric constraints: Limited by tool access—undercuts, deep cavities, and complex internal features are difficult or impossible
- Cooling limitations: Cooling channels are straight, drilled lines that cannot follow part geometry
- High cost for complex molds: Complexity adds machining time and cost
- Design iteration is expensive: Changes mean new CAM programming and more machine time
How 3D Printing Flips the Model
3D printed molds address every limitation:
| Metric | Traditional CNC Manufacturing | Additive Manufacturing (DMLS/SLM) |
|---|---|---|
| Lead Time | Weeks to Months | Days to Weeks |
| Geometric Complexity | Limited by tool paths and cutter access | Nearly unlimited; complex internal geometries are standard |
| Cooling Channel Design | Straight, gun-drilled lines | Complex, freeform conformal channels |
| Cost for Low-Volume/Prototypes | High setup and machining cost | More economical; no complex CAM programming |
| Material Waste | High (subtractive process) | Low (additive process) |
| Design Iteration | Costly and time-consuming | Fast and relatively inexpensive to print a new version |
The difference is dramatic—a fundamental shift from mold making as a long-term, expensive investment to a flexible, performance-focused asset.
What Technologies and Materials Are Used for 3D Printed Molds?
Direct Metal Laser Sintering (DMLS) / Selective Laser Melting (SLM)
The primary technology for production-quality metal molds is Direct Metal Laser Sintering (DMLS) , also called Selective Laser Melting (SLM) .
How it works:
- A thin layer of fine metal powder is spread over a build plate
- A high-power laser selectively scans the layer, melting powder particles together based on the 3D model
- The build plate lowers, a new powder layer is applied
- The process repeats, building the solid metal part layer by layer
Key characteristics:
- Produces parts with >99.9% density
- Excellent mechanical properties
- Fine details and complex internal structures
- Layer thickness typically 20–60 μm
This method is ideal for manufacturing mold cavities, cores, and inserts.
Important Mold Materials
Material choice depends on hardness, wear resistance, heat conduction, and operating temperature requirements.
Maraging Steel (e.g., MS1, 18Ni300)
Key Properties:
- Exceptional strength and high hardness
- Achieved through low-temperature aging heat treatment—reduces distortion risk
- Good weldability—advantageous for repairs or design changes
- Can achieve extremely fine features
Best Use Case:
- Complex inserts with detailed features, fine textures
- Integrated conformal cooling channels
- Prototype molds
- Applications where post-print modifications may be needed
Hardness: 52–54 HRC after heat treatment
Tool Steel (e.g., H13)
Key Properties:
- High-temperature strength
- Excellent thermal fatigue resistance
- Superior wear resistance
- Long-standing industry standard
Best Use Case:
- Direct replacement of traditionally made production molds
- High-wear scenarios involving abrasive materials (glass-filled polymers)
- Long production runs where durability and thermal stability are critical
Hardness: 48–52 HRC after proper heat treatment
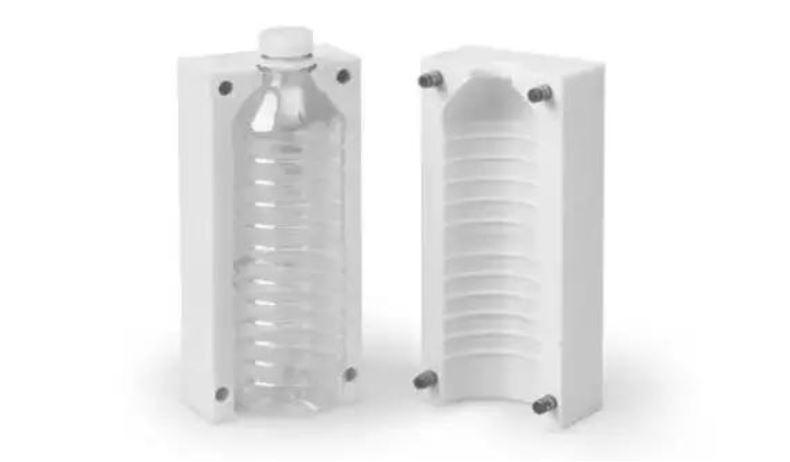
What Is Conformal Cooling and Why Does It Matter?
The Problem with Traditional Cooling
Traditional molds use straight, drilled cooling lines. These cannot follow complex part geometry, creating:
- Hot spots in thick sections or areas far from cooling lines
- Cold spots elsewhere
- Uneven cooling that extends cycle times and causes defects
Cooling typically accounts for up to 70% of the total injection molding cycle time.
Conformal Cooling: The 3D Printing Advantage
Conformal cooling means cooling channels that follow the precise 3D contours of the mold's cavity and core surfaces, maintaining a consistent distance from the part.
Because the mold is built layer by layer, intricate, free-form cooling channels can be designed directly into the mold inserts. These channels snake around complex features, maintaining uniform distance from the molding surface.
The Real Benefits
1. Cycle Time Reduction
By removing heat more rapidly and uniformly, conformal channels drastically shorten the cooling phase. Reductions of 15–50% are commonly reported, with greatest gains in thick-walled or complex parts. This translates directly to higher machine output and lower cost per part.
2. Improved Part Quality
Uneven cooling causes many common molding defects. Conformal cooling reduces or eliminates:
- Sink marks: Depressions in thick sections
- Warpage: Distortion from uneven shrinkage
- Internal stresses: Can compromise structural integrity
3. Enhanced Dimensional Stability
Consistent cooling leads to consistent shrinkage. Parts have superior dimensional stability and tighter tolerances from shot to shot—critical for high-precision components.
What Is the Hybrid Manufacturing Approach?
While printing an entire mold block is possible, it's often not the most practical or cost-effective strategy. Hybrid manufacturing combines the strengths of 3D printing and traditional CNC machining.
The Hybrid Strategy
Use 3D Printing (DMLS/SLM) for:
- Geometrically complex or thermally demanding components
- Core and cavity inserts redesigned for conformal cooling
- Parts with intricate, hard-to-machine details
Use CNC Machining for:
- Simpler, larger components (mold base, ejector system, support plates)
- Standard tool steel (e.g., P20)
- Critical final finishing on printed inserts to achieve required tolerances and surface finishes
Why This Approach Works
Cost-Effectiveness: Printing a small, complex insert uses far less expensive metal powder than printing an entire multi-ton mold block. The bulk of the tool is made using cost-effective conventional methods.
Superior Surface Finish: Mirror-like SPI A-1 or A-2 finishes often require post-processing. The hybrid approach integrates precision milling, grinding, or polishing of critical molding surfaces.
Accuracy and Tolerances: CNC machining excels at producing highly accurate flat and parallel surfaces. Machining the mold base and insert pockets ensures perfect alignment and fit.
Material Flexibility: Strategic material selection—standard steel for the base, high-performance printed material for the insert.
Our experience: The most successful projects identify the most thermally critical or geometrically complex part of the mold and designate it as a printed insert. This targeted approach yields 80% of the benefit for 20% of the cost of a fully printed tool.
How Durable Are 3D Printed Molds?
A common question: "Will a printed mold last as long as a traditional one?"
Thermal Fatigue: The Primary Failure Mechanism
Thermal fatigue is the main cause of mold failure—the material stress from constant expansion and contraction as hot plastic is injected and then rapidly cooled.
Material Performance
H13 Tool Steel: When produced via DMLS and properly heat treated, printed H13 exhibits mechanical properties highly comparable to traditionally wrought material. Its excellent thermal fatigue resistance is retained, making it reliable for long-run production tooling.
Maraging Steel: Chosen for its ability to be hardened with low-temperature heat treatment, minimizing distortion and making it perfect for highly detailed inserts that might be compromised by high-heat quenching.
The Role of Material Structure
The 3D printing process creates a unique, fine-grained structure. Post-print heat treatments relieve internal stresses.
For the most demanding applications, Hot Isostatic Pressing (HIP) can be employed. HIP subjects the part to high temperature and uniform pressure, eliminating microscopic internal voids and creating a fully dense (>99.9%), uniform material. This refined structure is crucial for preventing micro-crack initiation and propagation.
Multiple studies show that printed H13, especially after HIP treatment, can achieve fatigue life comparable to, and in some cases exceeding, traditionally machined H13.
What's the Financial Case for 3D Printed Molds?
A simple "tool vs. tool" cost comparison is misleading. The true financial analysis must account for total cost of ownership (TCO) and the impact on production efficiency.
Cost Comparison Framework
| Cost Factor | Traditional CNC Mold | Printed Mold (with Conformal Cooling) |
|---|---|---|
| Upfront Tooling Cost | High—complex CAM, long machine times | Variable—can be higher for simple parts, lower for complex inserts |
| Tooling Lead Time Cost | High—weeks/months of delayed production | Low—faster tool delivery accelerates production |
| Cost Per Part (Cycle Time) | Higher—longer cooling, lower throughput | Lower—cycle time reductions of 15–50% |
| Scrap Rate / Quality Cost | Higher defect potential | Lower—uniform cooling reduces defects |
| Tool Modification Cost | Extremely high—welding, re-machining, or new tool | Moderate—print new modified insert |
| Total Cost of Ownership (TCO) | Often high despite lower initial price | Often lower due to cycle time and quality savings |
Real-World Example: Automotive Lighting
The Challenge: An automotive Tier 1 supplier manufactured a complex headlamp lens from polycarbonate. Traditional straight-drilled cooling channels created severe hot spots in thick areas, leading to:
- 55-second cycle time
- 9% scrap rate due to sink marks and molded-in stress
The Solution: A hybrid approach:
- Retained existing mold base
- Redesigned core insert with conformal cooling channels
- Printed in Maraging Steel via DMLS
- CNC-machined and polished to optical-grade finish (SPI A-1)
The Results:
- Cycle time reduced: 55 seconds → 38 seconds (31% improvement)
- Scrap rate plummeted: 9% → less than 2%
- Quality improved: No visible sink marks; drastically reduced molded-in stress
- ROI: Higher upfront cost recovered in under four months
What Design Considerations Matter for Printed Molds?
Conformal Channel Design
Effective conformal channels require careful consideration:
- Channel diameter: Typically 3–8 mm
- Distance from cavity wall: Often 1.5–2x channel diameter
- Flow rate: Must maintain turbulent flow for efficient heat transfer
- Pressure drop: Must stay within pump capabilities
Advanced thermal simulation software is essential, allowing designers to virtually model heat flow and optimize channel layout before printing.
Design for Additive Manufacturing (DfAM)
Success requires a mindset shift:
- Design for layer-by-layer building
- Consider orientation for optimal surface quality
- Plan for support structures and their removal
- Account for post-processing steps
How Does Yigu Technology Approach 3D Printed Molds?
As a non-standard plastic and metal products custom supplier, Yigu Technology helps clients implement printed molds for production efficiency.
Our Experience
Automotive lighting: We worked with a Tier 1 supplier to redesign a headlamp lens mold with conformal cooling. Printed insert, hybrid approach. Results: 31% cycle time reduction, 9% → 2% scrap rate, under 4 months ROI.
Consumer electronics: A client needed molds for complex housings with tight tolerances. Traditional machining would take 8 weeks. We printed inserts in 2 weeks. Production started sooner. Parts met all specifications.
Medical device: Custom mold for a patient-specific component. Complex geometry impossible to machine. Printed insert in Maraging Steel captured every detail. Production runs successful.
Our Capabilities
- DMLS/SLM metal printing for mold inserts
- Maraging Steel and H13 materials
- Hybrid manufacturing combining printed inserts with CNC-machined bases
- Design assistance for conformal cooling optimization
- Post-processing including heat treatment and precision finishing
Quality Commitment
- Material selection guidance
- Thermal simulation
- Dimensional verification
- Surface finishing to required specifications
Conclusion
3D printed molds are not experimental—they are a proven, powerful tool for modern injection molding. The benefits are clear:
- Speed: Weeks to days lead time, 15–50% cycle time reduction
- Quality: Fewer defects, better dimensional stability
- Complexity: Conformal cooling, intricate geometries impossible to machine
- Cost: Lower TCO through efficiency gains
- Flexibility: Fast, inexpensive design iterations
Real-world results prove the value:
- 31% cycle time reduction in automotive lighting
- 9% to 2% scrap rate improvement
- Under 4 months ROI
The hybrid approach—printing complex inserts, machining simple bases—delivers maximum benefit at manageable cost.
For manufacturing leaders, the message is clear: look beyond initial tool cost. Evaluate total financial and operational impact. 3D printed molds deliver speed, quality, and complexity that traditional methods cannot match.
The future of tooling is additive. And it's already here.
Frequently Asked Questions
Q1: What materials are used for 3D printed molds?
Two industry standards: Maraging Steel (e.g., MS1, 18Ni300) for complex inserts with fine features and conformal cooling; H13 tool steel for high-wear production molds requiring thermal fatigue resistance. Both achieve hardness of 48–54 HRC after heat treatment.
Q2: How long do 3D printed molds last?
Properly printed and post-processed molds have fatigue life comparable to traditionally machined molds. H13 with HIP treatment can exceed traditional performance. Maraging Steel is excellent for detailed inserts where high-temperature fatigue is less critical.
Q3: What is conformal cooling?
Cooling channels that follow the 3D contours of the mold cavity, maintaining consistent distance from the part. This enables faster, more uniform cooling, reducing cycle times and eliminating defects caused by uneven cooling.
Q4: How much can conformal cooling reduce cycle time?
Typical reductions of 15–50% , with greatest gains in thick-walled or complex parts. Since cooling accounts for up to 70% of cycle time, improvements are dramatic.
Q5: Are 3D printed molds more expensive than machined molds?
Initial cost can be higher for simple molds, but often lower for complex inserts. The true financial comparison must consider total cost of ownership—cycle time savings, reduced scrap, faster time-to-market. ROI is often measured in months.
Q6: Can 3D printed molds achieve optical-grade surface finishes?
Yes, through hybrid manufacturing. The printed insert is CNC-machined and polished after printing to achieve SPI A-1 or A-2 finishes required for optical parts.
Q7: What industries benefit most from 3D printed molds?
Automotive (lighting, complex components), consumer electronics (tight tolerance housings), medical (patient-specific devices), and any application requiring complex geometries, faster cycles, or improved quality.
Contact Yigu Technology for Custom Manufacturing
Ready to explore 3D printed molds for your injection molding operation? At Yigu Technology, we combine metal printing expertise with practical manufacturing experience. Our team helps you identify candidates for printed inserts, optimize designs for conformal cooling, and deliver quality tooling that improves your production.
Visit our website to see our capabilities. Contact us today for a free consultation and quote. Let's transform your mold making together.