Introduction
The Concept of Rapid Prototyping
Rapid prototyping, often abbreviated as RP, is a revolutionary set of techniques that enables the fast production of a physical model or prototype of a product from a digital design. This process has its roots in the 1980s when the need for a more efficient way to translate design concepts into tangible objects became increasingly apparent. It emerged as a response to the inefficiencies and long lead - times associated with traditional prototyping methods.
At its core, rapid prototyping uses additive manufacturing (3D printing), CNC machining, or other automated processes to build prototypes layer by layer or through precise material removal. For Yigu Technology example, in 3D printing, a digital 3D model is sliced into thin cross - sectional layers. The printer then deposits or fuses materials, such as plastics, metals, or ceramics, in a precise pattern according to the digital instructions, gradually building up the 3D object.
In the manufacturing ecosystem, rapid prototyping serves as a bridge between the design phase and mass production. It allows designers, engineers, and product developers to quickly test and validate their ideas, making it an indispensable part of the product development cycle.
Significance in the Modern Manufacturing Landscape
In today's highly competitive manufacturing environment, rapid prototyping has become a game - changer for several reasons:
- Time - to - Market Reduction: One of the most significant advantages is the drastic reduction in product development time. Traditional prototyping methods could take weeks or even months to produce a single prototype. With rapid prototyping, a prototype can often be produced in a matter of hours or days. A study by McKinsey found that companies that adopt rapid prototyping can reduce their time - to - market by up to 50%. This speed allows businesses to respond more quickly to market trends, customer demands, and emerging opportunities.
- Cost - Efficiency: Although the initial investment in rapid prototyping equipment can be high, it can lead to significant cost savings in the long run. By catching design flaws early in the development process, companies can avoid costly re - engineering and tooling changes during mass production. For instance, a small - to - medium - sized enterprise (SME) in the consumer electronics industry found that by using rapid prototyping, they reduced their development costs by 30% as they were able to identify and correct design issues before moving to production.
- Enhanced Design Iteration: Rapid prototyping enables multiple design iterations in a short period. Designers can quickly modify the digital model and produce a new prototype to test different concepts, features, and materials. This iterative process fosters innovation, as it allows for more creative and experimental designs. A design team working on a new smartphone case was able to test 10 different design variations in just two weeks using rapid prototyping, compared to only 2 - 3 variations in the same time frame with traditional methods.
- Improved Communication and Collaboration: Physical prototypes created through rapid prototyping provide a tangible reference for all stakeholders involved in the product development process, including designers, engineers, marketing teams, and clients. This shared understanding improves communication and collaboration, reducing misunderstandings and ensuring that everyone is aligned with the product vision.
The Mechanics of Rapid Prototyping
Key Technologies Involved
- 3D Printing (Additive Manufacturing):
- Fused Deposition Modeling (FDM): One of the most common 3D - printing techniques, FDM works by heating a thermoplastic filament, such as ABS or PLA. The molten material is then extruded through a nozzle, layer by layer, onto a build platform. For Yigu Technology example, in the creation of a simple plastic toy prototype, an FDM 3D printer would start by melting a thin strand of PLA filament. As the nozzle moves in the X - Y plane according to the digital design, it deposits the melted plastic, which cools and solidifies immediately. Once one layer is complete, the build platform moves down slightly, and the next layer is printed on top, gradually building up the 3D object. FDM is popular due to its relatively low cost, ease of use, and a wide range of available materials.
- Stereolithography (SLA): SLA uses a laser to cure liquid photopolymer resin. A digital 3D model is sliced into thin layers, and the laser traces the shape of each layer onto the surface of the resin. As the laser hits the resin, it solidifies, layer by layer, to form the final object. SLA is known for its high - resolution prints, making it ideal for creating detailed prototypes, such as jewelry prototypes or small, intricate mechanical parts. For instance, a jewelry designer can use SLA to create a highly detailed wax - like prototype of a necklace pendant with fine details and smooth surfaces that would be difficult to achieve with other methods.
- Selective Laser Sintering (SLS): SLS employs a high - power laser to sinter powdered materials, such as plastic, metal, or ceramic. The powder is spread evenly across a build platform, and the laser selectively sinters the powder particles together, layer by layer, based on the digital design. This process allows for the creation of functional prototypes with good mechanical properties. For Yigu Technology example, in the automotive industry, SLS can be used to create metal prototypes of engine components that can withstand high temperatures and mechanical stress during testing.
- CNC Machining:
- Computer - Aided Design (CAD) and Computer - Aided Manufacturing (CAM): CNC machining starts with a CAD model of the part. CAD software allows designers to create a 3D digital representation of the prototype. This model is then imported into CAM software, which generates the toolpaths and machining instructions for the CNC machine. For example, a mechanical engineer designing a new gearbox housing will first create a detailed 3D CAD model in software like SolidWorks. The CAM software will analyze the model, determine the best machining operations (such as milling, turning, or drilling), and generate the G - code that the CNC machine will use to fabricate the part.
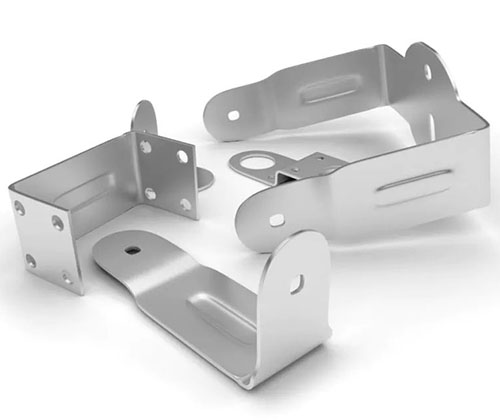
- Milling: In CNC milling, a rotating cutting tool removes material from a solid block (the workpiece) to create the desired shape. The CNC machine can move the cutting tool in multiple axes (usually three or more), allowing for the creation of complex 3D shapes. For instance, when creating a prototype of a custom - designed aluminum bracket, a CNC milling machine can precisely cut the edges, holes, and contours of the bracket according to the CAD - generated toolpaths.
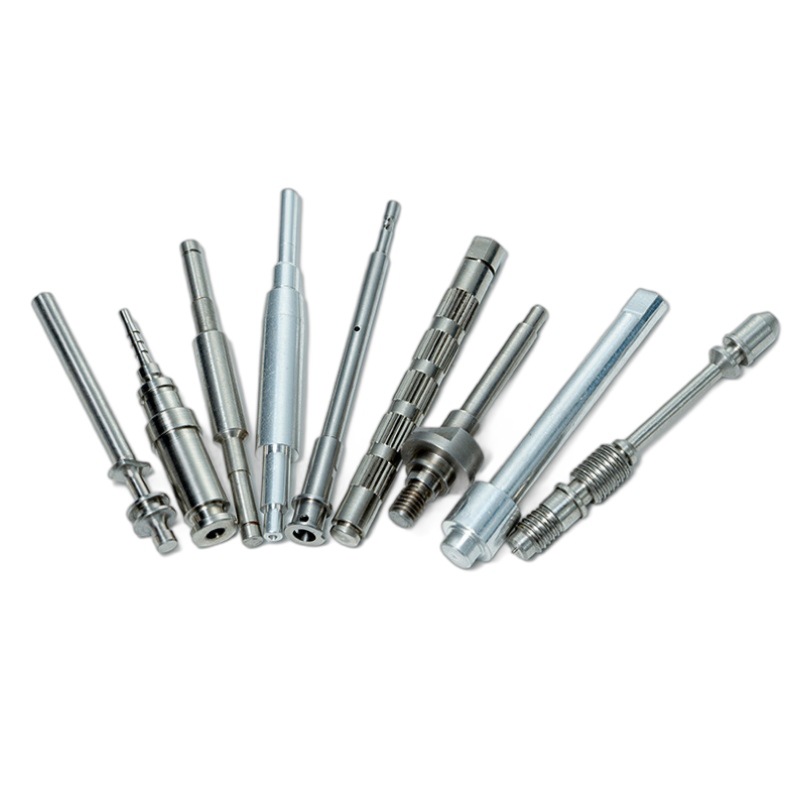
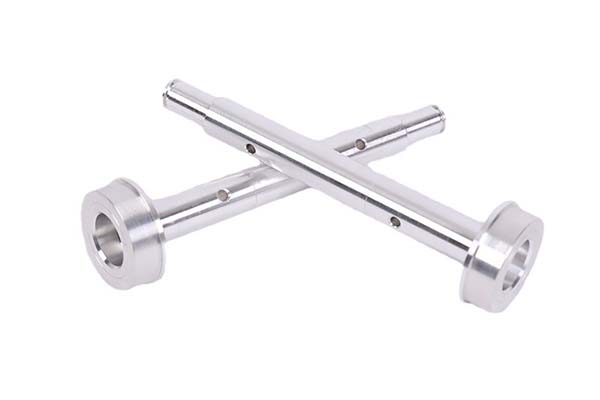
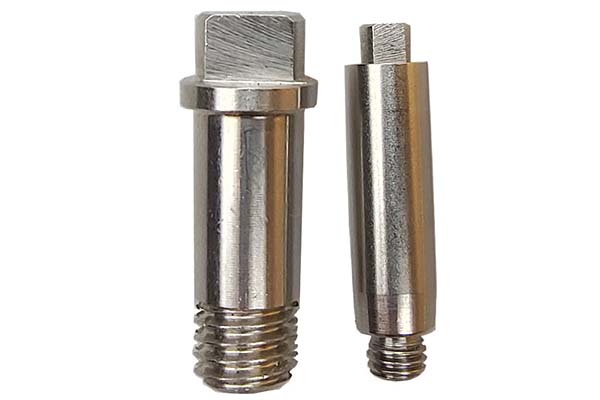
- Turning: CNC turning is used to create rotational parts, such as shafts or cylinders. The workpiece is rotated on a lathe, and a cutting tool moves in the X and Z axes (and sometimes the Y axis in multi - axis lathes) to remove material and shape the part. A common example is the production of a prototype of a metal shaft for a motor, where the CNC lathe can precisely turn the shaft to the required diameter and length, and add any necessary threads or grooves.
The Step - by - Step Process
- Design Creation:
- Use CAD software: Designers start by creating a 3D model of the product in CAD software. This can be from scratch or by modifying an existing design. For Yigu Technology example, if developing a new smartphone case, the designer will use CAD tools to define the shape, dimensions, cut - outs for ports, and any decorative elements.
- Design verification: Once the design is complete, it undergoes a verification process. This includes checking for design flaws, such as incorrect dimensions, interfering components, or non - manufacturable features. Simulation tools in CAD software can be used to test the design's performance, like how well the smartphone case will protect the phone from drops by simulating impact forces.
- File Preparation:
- File format conversion: The CAD file is usually saved in a format compatible with the rapid prototyping equipment. For 3D printing, common formats are.STL (Stereolithography), while for CNC machining, the file may be converted into a CAM - readable format. For example, an.STL file of the smartphone case design will be generated from the CAD model for use in a 3D printer.
- Slicing (for 3D printing): If using 3D printing, the.STL file is sliced into thin layers using slicing software. The slicing process determines the toolpaths for the printer, such as the movement of the nozzle or laser. Each layer's thickness is specified, typically ranging from 0.1mm - 0.3mm depending on the desired level of detail and print speed.
- Material Selection:
- For 3D printing: Different 3D - printing technologies require specific materials. FDM can use materials like ABS, PLA, PETG, and even some specialized filaments for conductive or flexible parts. SLA uses photopolymer resins, and SLS uses powdered materials. For the smartphone case, if using FDM, PLA might be chosen for its ease of printing, relatively low cost, and good mechanical properties for a consumer - facing product.
- For CNC machining: The material is selected based on the requirements of the prototype. Common materials include metals like aluminum, steel, and titanium, as well as plastics such as acrylic and polycarbonate. If the smartphone case prototype needs to have a high - strength and heat - resistant property, a heat - resistant plastic like polycarbonate might be chosen for CNC machining.
- Prototype Production:
- 3D printing: The 3D printer follows the toolpaths generated during the slicing process. It deposits or cures the material layer by layer until the entire prototype is complete. For example, in an FDM 3D printer, the heated nozzle extrudes the melted PLA filament, layer by layer, to build the smartphone case.
- CNC machining: The CNC machine reads the machining instructions (G - code) generated by the CAM software. It then uses the appropriate cutting tools (such as end - mills for milling or turning tools for lathe operations) to remove material from the workpiece, gradually shaping it into the desired prototype.
- Post - Processing:
- Cleaning: Remove any excess material, support structures (in 3D printing), or chips (in CNC machining). For a 3D - printed smartphone case, the support structures that were used to hold the overhanging parts during printing need to be carefully removed.
- Finishing: This can include sanding, polishing, painting, or coating to improve the appearance and surface quality of the prototype. A CNC - machined aluminum smartphone case prototype might be polished to give it a smooth, shiny finish.
- Assembly (if applicable): If the prototype consists of multiple parts, they are assembled at this stage. For example, a smartphone case with a detachable back cover will have the two parts assembled after individual production and post - processing.
Comparing Rapid Prototyping with Traditional Methods
Cost - Efficiency Analysis
When it comes to the cost of prototyping, rapid prototyping and traditional methods show significant differences. The following Yigu Technology table provides a detailed cost - efficiency analysis:
| Cost Aspect | Rapid Prototyping | Traditional Prototyping |
| Equipment | Initial investment in 3D printers or CNC machines can be high, ranging from a few thousand dollars for entry - level 3D printers to hundreds of thousands for high - end CNC equipment. However, in the long run, the cost per prototype can be relatively low as the equipment can be used for multiple projects. | High - cost specialized machinery for each manufacturing process, such as injection molding machines. The cost of these machines can be in the millions of dollars, and they are often dedicated to a specific type of production, which may not be cost - effective for small - scale prototyping. |
| Materials | A wide range of materials are available, and the cost varies depending on the type. For example, common 3D - printing materials like PLA filament cost around \(20 - \)50 per kilogram. Some advanced materials for SLS or metal 3D printing are more expensive but still offer cost - savings in terms of reduced waste as only the necessary material is used. | Materials for traditional methods often require larger quantities to be purchased. For injection molding, the cost of raw plastic pellets can be high, and there is often a lot of material waste during the production process, especially when creating complex shapes. |
| Labor | Skilled operators are needed, but the overall labor time is often shorter. Once the digital model is prepared and the machine is set up, the production process is mostly automated. For example, a simple 3D - printed prototype can be left to print overnight with minimal operator intervention. | Traditional prototyping usually requires more labor - intensive processes. For example, in hand - crafted prototypes, highly skilled craftsmen may spend days or weeks shaping the prototype. In injection molding, there are multiple steps including mold design, mold making, and production, each requiring different levels of expertise and significant labor hours. |
| Total Cost for Small - Scale Prototyping (e.g., 1 - 10 prototypes) | Can be relatively low, especially when using cost - effective 3D - printing technologies. For a simple plastic prototype, the total cost might be in the range of \(100 - \)500, including materials and equipment usage. | Can be prohibitively high, often in the thousands of dollars. The cost of mold making alone for injection molding can be \(1000 - \)5000, not including material and labor costs for the actual production of the prototypes. |
Time - Saving Aspects
Time is a crucial factor in product development, and rapid prototyping has a clear edge over traditional methods. A study by Deloitte found that on average, traditional prototyping methods take 6 - 8 weeks to produce a single prototype. This is due to the complex processes involved, such as mold design, tooling, and multiple manufacturing steps.
In contrast, rapid prototyping can significantly reduce this time. With 3D printing, a simple prototype can be produced within 24 hours. Even for more complex prototypes, it rarely takes more than a week. For example, a consumer electronics company was able to reduce its prototyping time from 8 weeks with traditional methods to just 3 days using 3D - printing - based rapid prototyping. This represents a time - savings of over 90%, allowing the company to bring its products to market much faster and respond more quickly to market changes.
Design Flexibility and Iteration
Design flexibility and the ability to iterate quickly are two of the most significant advantages of rapid prototyping. In traditional prototyping, making design changes can be extremely time - consuming and costly. For example, in injection molding, if a design change is needed after the mold has been made, the entire mold may need to be redesigned and remade, which can take weeks and cost thousands of dollars.
Rapid prototyping, on the other hand, enables quick design modifications. Since the process starts with a digital model, designers can easily make changes to the CAD file. Once the changes are made, a new prototype can be produced in a short time. A design team working on a new furniture product was able to test 5 different design variations in a week using rapid prototyping. Each time they made a change to the design based on user feedback, they could quickly print a new prototype. With traditional methods, it would have been nearly impossible to test more than one or two variations in the same time frame, severely limiting the creativity and optimization potential of the design process.
Case Studies: Innovation Driven by Rapid Prototyping
In the Automotive Industry
The automotive industry has been significantly transformed by rapid prototyping. Take Tesla, for example. When developing new electric vehicle models, Tesla heavily relies on rapid prototyping to accelerate the design and development process. In the development of their Model Y, rapid prototyping using 3D printing and CNC machining allowed the engineering team to quickly create and test various component prototypes.
They were able to test different battery pack designs, motor mounts, and interior components. By using 3D - printed plastic prototypes for the interior, such as dashboard components, they could rapidly iterate on the design based on user feedback and ergonomic studies. The time taken to develop a new interior design concept was reduced from months to just a few weeks. This not only saved time but also enabled them to incorporate more innovative features. For instance, the unique center console design in the Model Y was the result of multiple design iterations made possible by rapid prototyping.
Moreover, in the area of aerodynamics, rapid prototyping has been a game - changer. Car manufacturers can quickly produce scale - model prototypes of new car designs and test them in wind tunnels. A study by the University of Michigan found that using rapid - prototyped scale models in wind tunnel testing reduced the overall development time for improving a car's aerodynamic performance by 40%. By being able to quickly modify and test the prototypes, automotive engineers can optimize the shape of the car to reduce drag, improve fuel efficiency, and enhance overall vehicle performance.
In the Medical Field
In the medical field, rapid prototyping has enabled remarkable advancements, especially in the area of personalized medicine. Lima, an orthopedic implant manufacturer, has been at the forefront of using rapid prototyping for implant production. They use 3D printing to create customized orthopedic implants, such as hip and knee replacements.
By analyzing a patient's CT or MRI scans, Lima can create a digital model of the patient's bone structure. This model is then used to design an implant that perfectly fits the patient's anatomy. For example, in the case of a patient with a complex hip - joint deformity, a traditional off - the - shelf implant would not provide the best fit or functionality. Lima uses 3D - printed titanium implants with a trabecular structure, similar to natural bone, which promotes better bone integration. Since 2007, when they first introduced their 3D - printed 髋臼杯植入物 (acetabular cup implants), they have produced over 100,000 implants with excellent clinical results. A 2015 study showed that patients who received these implants had an average Harris Hip Score increase from 44.2 to 95.9 (out of 100) at least five years after the surgery.
Another example is the use of rapid prototyping for surgical planning. In complex surgeries, such as the separation of conjoined twins, 3D - printed anatomical models are invaluable. Laser Modeling Israel (LMI) used HP's Multi - Jet Fusion (MJF) technology to create 3D - printed models of conjoined twins' bodies, including their skulls, skin, and internal organs. These models were made with materials that could be sterilized and were designed to be fully movable, allowing surgeons to simulate the complex separation surgery multiple times. This significantly reduced the risks associated with the surgery and improved the chances of a successful outcome.