Introduction
In the fast - evolving landscape of modern manufacturing, the Stereolithography Apparatus (SLA) printing process has emerged as a game - changer. This advanced 3D printing technology has found its way into various industries, from aerospace and automotive to healthcare and jewelry design.
SLA printing allows for the creation of highly detailed, complex, and accurate 3D objects. It has enabled companies to reduce product development time significantly. For example, in the automotive industry, prototyping new parts with SLA can cut down the traditional prototyping time from weeks to just a few days. This not only speeds up the innovation cycle but also saves a substantial amount of money.
In the healthcare field, SLA printing is used to create patient - specific anatomical models. Surgeons can use these models to plan complex surgeries in advance, increasing the success rate of operations. Given its far - reaching impact, it's essential to understand the SLA printing process in depth. In the following sections, we will explore its working principles, materials used, advantages, and limitations.
What is SLA Printing Process?
Definition and Basics
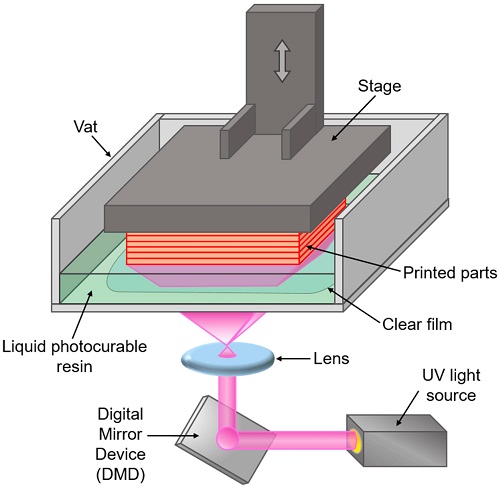
SLA, short for Stereolithography Apparatus, is a revolutionary 3D printing technology. It belongs to the family of vat photopolymerization 3D printing methods. The fundamental concept of the SLA printing process is to create three - dimensional objects by solidifying liquid photopolymer resin layer by layer using light, typically ultraviolet (UV) light. This process is based on the principle of photopolymerization, where the resin undergoes a chemical reaction when exposed to the appropriate wavelength of light, transforming from a liquid state to a solid state.
Key Components Involved
- Light Source: Usually, an ultraviolet (UV) laser is used as the light source in SLA printers. The laser emits light with a specific wavelength that can initiate the photopolymerization reaction in the resin. For example, a common wavelength used is around 405 nm. This precise wavelength is crucial as it is absorbed by the photosensitive resin, triggering the cross - linking of polymer chains and thus solidifying the resin.
- Resin Tank: This is where the liquid photopolymer resin is stored. The tank is typically made of a material that is transparent to the UV light used by the printer, allowing the light to pass through and reach the resin. The size of the resin tank can vary depending on the printer model, and it needs to be large enough to hold sufficient resin for the printing job while also being easy to refill.
- Movable Platform: It is the platform on which the 3D object is built. At the start of the printing process, the platform is positioned at the bottom of the resin tank, just below the surface of the resin. As each layer of resin is solidified, the platform gradually moves downwards (or the resin tank moves upwards in some designs), allowing the next layer of resin to be exposed to the light and solidified. This continuous movement enables the creation of the complete 3D object, layer by layer.
How Does SLA Printing Process Work?
?
Step - by - Step Explanation
- Model Preparation:Before starting the SLA printing process, you need to have a 3D model. The most common file format for 3D models in 3D printing is the STL (Stereolithography) format. First, import the STL file into a slicing software. In the slicing software, you can perform several important operations. For example, you can position the model in the build space of the printer. This is crucial as the orientation of the model can affect the printing quality and the support structure required. You can also scale the model according to your needs. If you want to create a smaller or larger version of the original design, scaling allows you to adjust the dimensions accurately. Another key step is slicing the model. The slicing software divides the 3D model into multiple 2D cross - sections. Each cross - section represents a layer that will be printed. The thickness of these layers can be adjusted, typically ranging from as thin as 0.05 mm to 0.2 mm. Thinner layers result in a smoother surface finish but increase the printing time, while thicker layers can speed up the printing process but may lead to a slightly rougher surface.
- Resin Preparation:Selecting the right photopolymer resin is essential. Resins come in various types, each with different properties. For applications that require high strength, such as in the automotive or aerospace industries, resins with high - toughness formulations are chosen. In contrast, for creating clear and transparent objects like lenses or decorative items, transparent resins are the go - to option. Once you've selected the resin, ensure its proper preparation. The resin should be free of any impurities or lumps. Before pouring it into the resin tank of the SLA printer, gently stir the resin to ensure uniform distribution of its components. This is important because any non - uniformities in the resin can cause inconsistent curing during the printing process, leading to defects in the final 3D printed object.
- Printing Phase:Once the model is prepared in the software and the resin is ready, the actual printing begins. The SLA printer uses a light source, usually an ultraviolet (UV) laser. The laser projects the pattern of the first layer of the sliced model onto the surface of the liquid resin in the resin tank. The UV light causes the resin in that specific area to polymerize and solidify, forming the first layer of the 3D object. After the first layer is cured, the movable platform on which the object is being built either moves down (or the resin tank moves up in some printer designs) by a distance equal to the layer thickness. A new layer of liquid resin then covers the previously cured layer. The UV laser then projects the pattern of the second layer onto this new layer of resin, curing it and bonding it to the first layer. This process repeats layer by layer. For instance, if you are printing a small figurine that is 50 mm tall and the layer thickness is set to 0.1 mm, the printer will go through 500 such layer - by - layer curing steps until the entire figurine is printed.
- Post - Processing:After the printing is complete, the 3D printed object needs to go through several post - processing steps. First, it is removed from the printer and placed in a cleaning solution, usually isopropyl alcohol. This step is to wash away any uncured resin that remains on the surface of the object. After cleaning, the object may still need further curing. This is because the initial curing during the printing process may not be sufficient to achieve the maximum strength of the resin. A secondary curing process, often using a UV curing chamber, exposes the object to more UV light, enhancing its strength and durability. Finally, for a better surface finish, the object can be sanded and polished. Sanding helps to remove any rough edges or surface imperfections, and polishing gives the object a smooth and shiny appearance, especially important for applications where aesthetics matter, such as in jewelry or product design.
Applications of SLA Printing Process
In the Medical Field
The SLA printing process has made significant inroads into the medical field. For customized medical devices, it allows for the creation of implants that are tailored to an individual patient's anatomy. For example, in the case of cranial implants, SLA - printed implants can be designed to perfectly fit the unique shape of a patient's skull defect. According to a study, in complex craniofacial surgeries, the use of SLA - printed surgical guides has increased the accuracy of bone cutting by up to 30% compared to traditional methods. These surgical guides are created based on the patient's CT scan data, providing surgeons with a precise tool during operations.
SLA printing is also revolutionizing the production of prosthetics. By using this technology, prosthetics can be made more lightweight, yet still maintain their strength. They can also be designed with intricate internal structures that were previously impossible to achieve with traditional manufacturing methods. This not only improves the functionality of the prosthetics but also enhances the comfort for the wearers, significantly improving their quality of life.
In the Jewelry Industry
In the jewelry industry, SLA printing has become an indispensable tool. One of its main applications is in the creation of jewelry wax models. Designers can bring their most intricate and elaborate designs to life. For instance, a necklace with a complex filigree pattern that would take a skilled craftsman days to carve by hand can be printed using SLA technology in a matter of hours.
The use of SLA printing in jewelry production also shortens the overall production cycle. A study found that on average, the time from design concept to a finished wax model can be reduced by 40 - 60% when using SLA printing compared to traditional wax - carving techniques. This allows jewelry designers to quickly iterate on their designs and get their products to market faster, meeting the ever - changing demands of the fashion industry.
In Product Design and Prototyping
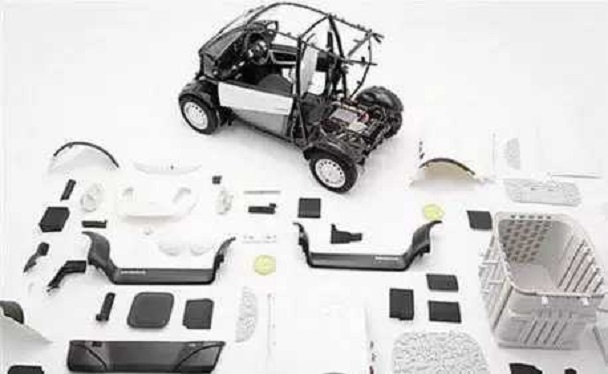
SLA printing plays a crucial role in product design and prototyping. It enables designers to rapidly transform their digital design concepts into physical prototypes. Take the example of a consumer electronics company developing a new smartphone. Using SLA printing, they can create a prototype of the phone's exterior casing within a few days. This allows them to evaluate the ergonomics, aesthetics, and functionality of the design early in the development process.
Compared to traditional prototyping methods, which often involve time - consuming and expensive tooling, SLA printing offers a more cost - effective and efficient solution. According to industry data, SLA - printed prototypes can cost up to 70% less than prototypes made using traditional injection - molding methods in the initial stages of product development. Designers can make multiple design changes and create new prototypes quickly, leading to better - refined products before mass production.
Yigu Technology's View
As a non - standard plastic and metal products custom supplier, Yigu Technology sees great potential in the SLA printing process for customized product manufacturing. SLA's ability to create highly complex designs is a game - changer for us. It allows us to bring our clients' most intricate ideas to life, especially in the production of prototypes and small - batch customized products.
However, we also acknowledge its limitations. The high cost of SLA printers and the relatively expensive photopolymer resins can be a deterrent, especially for large - scale production. Additionally, the limited range of materials compared to other manufacturing methods restricts its application in some cases.
To address these issues, we are constantly exploring ways to optimize the SLA process. We work closely with material suppliers to find cost - effective resin alternatives without sacrificing quality. Moreover, we are investing in research to improve the post - processing techniques, aiming to reduce the overall production time and cost while enhancing the final product quality. By combining our expertise in custom manufacturing with the advantages of SLA printing, we strive to provide our clients with the best possible solutions for their non - standard product needs.
FAQ
What types of materials are commonly used in SLA printing?
Commonly used materials in SLA printing are mainly photopolymer resins. For instance, standard resins are suitable for general - purpose applications like creating prototypes for product design. They offer a balance between cost - effectiveness and basic mechanical properties. High - strength resins are used when the printed parts need to withstand significant stress, such as in automotive or aerospace prototypes. Clear resins are ideal for applications where transparency is required, like optical lenses or see - through enclosures. Flexible resins can create parts with rubber - like properties, useful for items like flexible gaskets or soft - touch grips.
How accurate is the SLA printing process?
The SLA printing process is highly accurate. Generally, the layer thickness can range from as thin as 0.05 mm to 0.2 mm. In terms of dimensional accuracy, it can achieve an accuracy of ±0.1 mm per 25 mm of the printed part's size. However, several factors can affect the accuracy. The quality of the SLA printer itself, including the precision of its moving parts and the stability of the light - projection system, plays a crucial role. Additionally, the type of resin used can influence accuracy, as different resins may have varying degrees of shrinkage during the curing process.
Can SLA - printed parts be used for functional end - use applications?
SLA - printed parts can be used for functional end - use applications under certain conditions. They are great for low - volume production where complex geometries are required. For example, in the medical field, SLA - printed surgical guides are used directly in operations. In some consumer products, small - scale production of intricate components can also be achieved with SLA printing. However, there are limitations. The mechanical properties of SLA - printed parts may not be as robust as those made from traditional manufacturing methods in some cases. They may also be more sensitive to environmental factors such as heat and humidity, which could limit their use in applications where exposure to extreme conditions is expected.