Introduction
Metal parts for cars and airplanes. Household tools and electronic devices. Behind every precision component is a process that shapes raw materials into functional, accurate products: mechanical machining. It is the backbone of manufacturing, turning metals, plastics, and wood into components that meet exacting specifications.
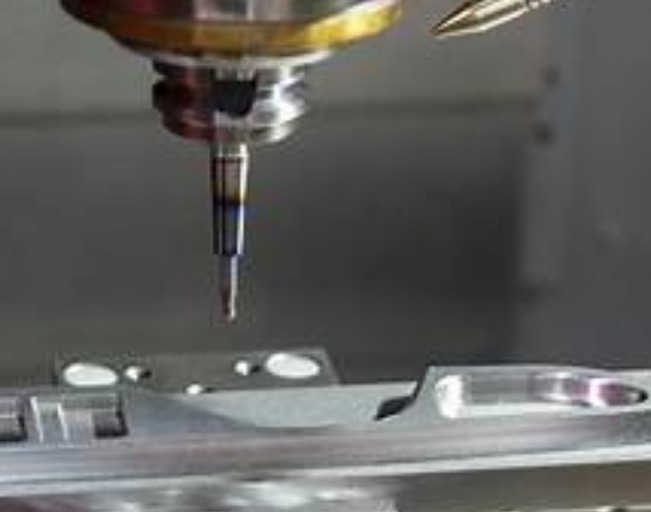
Mechanical machining is subtractive—it removes material from a workpiece to create the desired shape, size, or surface finish. Unlike 3D printing (additive) or casting (formative), machining excels at producing high-precision parts with tight tolerances, often as small as 0.001 inches .
This guide covers mechanical machining from basics to advanced optimization. You will learn about conventional cutting processes, material removal mechanisms, cutting tool technology, machining parameters, and equipment. By the end, you will have a comprehensive understanding of how precision components are made.
What Is Mechanical Machining, and Why Does It Matter?
The Basics
Mechanical machining is a subtractive manufacturing process. It removes material from a workpiece to achieve desired shape, size, or surface finish.
Why It Is Indispensable
| Advantage | Description |
|---|---|
| Precision | Critical for industries like aerospace. Jet engine turbine blades require machining tolerances of ±0.0005 inches for safe high-speed operation. |
| Versatility | Works with hundreds of materials: aluminum, steel, titanium, composites, plastics, wood. |
| Consistency | Produces identical parts in large quantities; essential for mass production (e.g., smartphone components). |
Real-world example: A small automotive parts supplier used machining to produce custom brake calipers. Combining milling and drilling, they achieved a surface finish of 32 RMS —a level impossible with casting alone. Precision ensured calipers fit perfectly with other brake components, reducing noise and improving safety.
What Are the Conventional Cutting Processes?
Conventional cutting processes use sharp tools to remove material. These are the building blocks of machining.
| Process | What It Does | Common Uses |
|---|---|---|
| Turning | Rotates workpiece while tool moves linearly to cut shapes (e.g., cylinders) | Axles, bolts, pipes, shafts |
| Milling | Uses rotating tool to cut flat, curved, or complex shapes (e.g., slots) | Gearboxes, engine blocks, custom brackets |
| Drilling | Creates holes using rotating drill bit | Holes for screws, pipes, wiring |
| Boring | Enlarges or refines existing holes to improve accuracy | Engine cylinders, bearing seats |
| Reaming | Smooths and sizes drilled holes to tight tolerances (e.g., ±0.0001 inches) | Holes for precision fasteners or bearings |
| Tapping | Creates internal threads (e.g., for screws) in drilled holes | Nut threads, threaded holes in machinery |
Pro tip: For beginners, start with drilling or turning—they are simpler to learn than milling, which requires more precise tool path planning. In a machining workshop, students mastered basic drilling in hours but took a full day to become comfortable with milling complex shapes.
How Does Material Removal Actually Work?
The Science of Chip Formation
When a cutting tool touches the workpiece, two things happen:
- Shear deformation – Material in front of the tool is pushed sideways, creating a “shear zone” where material changes shape.
- Chip formation – Deformed material breaks off as chips. Chip type reveals process quality.
| Chip Type | What It Looks Like | What It Means |
|---|---|---|
| Continuous chip | Long, curly, smooth (like a metal ribbon) | Ideal! Sharp tools, correct speed, ductile materials (aluminum, mild steel) |
| Discontinuous chip | Short, broken pieces (like small shavings) | Brittle materials (cast iron) or dull tools; can cause rough surface finish |
| Built-up edge (BUE) | Clump of material stuck to tool tip | Bad! Scratches workpiece, reduces tool life, ruins precision. Caused by low cutting speed or sticky materials (aluminum) |
Real-world example: A client’s aluminum parts had rough, scratched surfaces. Cutting speed was 50 SFM—too low for aluminum. Increasing speed to 300 SFM eliminated built-up edge and achieved a smooth 63 RMS finish .
Key Forces at Play
| Force | Description | Impact |
|---|---|---|
| Cutting force | Force tool exerts on workpiece | Too much force bends workpiece or breaks tool. Drilling a 1-inch hole in stainless steel requires 500–800 pounds of force—rigid machine needed to avoid vibration |
| Tool-workpiece interface | Area where tool and workpiece touch | Friction generates heat, which can soften tool (reducing life) or warp workpiece. Coolants reduce friction by up to 30% |
How Do You Choose the Right Cutting Tool?
Tool Geometry: Angles That Matter
| Angle | Description | Effect |
|---|---|---|
| Rake angle | Angle between tool’s top surface and horizontal line | Positive rake (5–15°) reduces cutting force and heat—great for soft materials like aluminum. Negative rake (-5 to -10°) is stronger—ideal for hard materials like titanium or cast iron |
| Clearance angle | Angle between tool’s bottom surface and workpiece (5–12°) | Prevents tool from rubbing against workpiece (which causes wear and rough finishes) |
Professional insight: For hard steel (e.g., 4140 alloy steel), use negative rake angle (-7°) and larger clearance angle (10°). This combination reduces tool wear by 20–30% compared to positive rake.
Tool Materials
| Material | Hardness (HRC) | Best For | Tool Life (Typical) |
|---|---|---|---|
| High-speed steel (HSS) | 60–65 | Soft materials (aluminum, brass), low-speed jobs | 1–2 hours (drilling mild steel) |
| Carbide | 80–85 | Most metals (steel, stainless steel), high-speed machining | 4–8 hours (milling 1018 steel) |
| Ceramic | 90–95 | Very hard materials (cast iron, hardened steel) | 10–15 hours (turning cast iron) |
| CBN | 95–100 | Hardest materials (titanium, superalloys) | 20–30 hours (machining Inconel) |
| PCD | 100 | Non-metals (plastics, composites, wood) | 50+ hours (machining plastic parts) |
Data point: Carbide tools are used for 70% of all machining jobs (American Machinists Association survey, 2024). They balance cost, speed, and durability.
Tool Wear and Tool Life
| Wear Type | Description | Replacement Rule |
|---|---|---|
| Flank wear | Wear on tool’s side from rubbing | Replace when flank wear reaches 0.015 inches (carbide) or 0.030 inches (HSS) |
| Crater wear | “Dent” on tool’s top surface from high heat and chip flow | Monitor; replace when significant |
Example: Milling 1018 steel at 300 SFM, a carbide tool typically lasts 6 hours before needing replacement.
How Do You Optimize Machining Parameters?
Key Parameters
| Parameter | Description | Example Ranges |
|---|---|---|
| Cutting speed (SFM) | How fast tool moves across workpiece | Aluminum: 200–400 SFM; stainless steel: 50–150 SFM |
| Feed rate (IPR) | How far tool moves per revolution | Drilling 0.5-inch hole in steel: 0.005–0.010 IPR |
| Depth of cut (DOC) | How much material removed in one pass | Roughing: 0.1–0.5 inches; finishing: 0.001–0.01 inches |
Optimization Strategy
Optimization balances three things: surface finish, tool life, and machining time (cost).
- Roughing – Use high DOC (0.2–0.5 inches) and moderate feed rate to remove most material quickly.
- Finishing – Lower DOC (0.005–0.01 inches) and slow feed rate to improve surface finish.
- Test and adjust – Run small batch, check finish and tool wear, tweak speed/feed. If finish is too rough, lower feed rate by 10%.
Case study: A furniture manufacturer spent 2 hours machining each wooden table leg using slow feed rate for “safety.” Increasing feed rate from 0.005 to 0.015 IPR (same speed) cut machining time to 45 minutes—saving $1,200 per week in labor costs. Surface finish remained smooth enough for their needs.
The Role of Coolants and Lubricants
| Function | Benefit |
|---|---|
| Cooling | Reduce heat from friction; prevents tool softening and workpiece warping |
| Lubrication | Reduce friction between tool and chip; improves finish and tool life |
| Chip removal | Flush chips away from cutting area; prevents scratching |
Recommendation: For metal machining, use water-soluble coolants (cheaper, easier to clean than oil-based). For wood or plastic, use light oil or compressed air to avoid staining.
What Machine Tools and Components Are Essential?
Essential Machine Tools
| Machine Type | What It’s Used For | Best for Beginners? | Price Range (New) |
|---|---|---|---|
| Lathe | Turning (cylinders, cones, threads) | Yes (simple to learn) | $2,000–$20,000 |
| Milling machine | Milling (flat surfaces, slots, complex shapes) | No (needs more skill) | $5,000–$50,000 |
| Drill press | Drilling and tapping holes | Yes (very beginner-friendly) | $500–$5,000 |
Beginner tip: Start with a benchtop lathe or drill press (under $3,000). They are small, safe, and perfect for learning basics.
Key Components for Precision
| Component | Function | Importance |
|---|---|---|
| Workholding | Keeps workpiece secure. Options: chucks (round parts), vises (flat parts), fixtures (custom jigs) | A cheap vise that slips can ruin expensive workpieces |
| Tool holders | Secure tool to machine. Collet chuck holds drill bits tightly to prevent wobble | Ensures tool stability |
| Spindle | Rotating part that drives tool or workpiece. High-precision spindle (<0.0001 inches runout) ensures accurate cuts | Critical for precision |
Professional insight: Invest in quality workholding first. A client who tried to save money on a vise scrapped 20 aluminum parts before buying a better one. The upgrade cost $200 but saved $1,000 in wasted material.
Machine Accuracy and Stiffness
| Factor | Description | Typical Values |
|---|---|---|
| Accuracy | How close cuts are to desired dimensions | Industrial: ±0.0005 inches/ft; hobbyist: ±0.001–0.002 inches/ft |
| Stiffness | How well machine resists bending under cutting force | Stiff machines reduce vibration, improving finish and tool life |
For most hobby projects, ±0.002 inches is sufficient. For aerospace parts, industrial-grade accuracy is required.
Conclusion
Mechanical machining is the foundation of precision manufacturing. Its subtractive nature—removing material to achieve exact dimensions—enables tolerances as tight as 0.001 inches , critical for aerospace, automotive, medical, and consumer products.
Conventional cutting processes—turning, milling, drilling, boring, reaming, tapping—form the building blocks. Each serves specific geometries and applications.
Material removal is governed by chip formation. Continuous chips indicate ideal conditions; built-up edges signal problems that degrade surface finish and tool life.
Cutting tool selection balances geometry (rake and clearance angles) and material (HSS, carbide, ceramic, CBN, PCD). Carbide tools dominate industry, used for 70% of machining jobs.
Parameter optimization balances surface finish, tool life, and cost. Roughing removes material quickly; finishing achieves precision. Coolants reduce heat, lubricate, and remove chips.
Equipment choices—lathes, milling machines, drill presses—depend on application and skill level. Quality workholding and precision spindles are essential for accuracy.
From brake calipers with 32 RMS finishes to table legs machined 60% faster, mechanical machining delivers the precision, consistency, and versatility that modern manufacturing demands.
FAQ
What is the difference between conventional machining and CNC machining?
Conventional machining is manual—operator controls tool and workpiece (e.g., turning a handwheel on a lathe). CNC (Computer Numerical Control) machining uses computers to automate the process. CNC is faster, more consistent, and better for complex parts. Conventional machining is cheaper and simpler for small batches or hobby projects.
Which material is the hardest to machine?
Superalloys like Inconel (used in jet engines) are the hardest. They have high heat resistance and strength, causing rapid tool wear. Machining Inconel requires CBN tools, low cutting speeds (20–50 SFM), and plenty of coolant.
How can I improve the surface finish of my parts?
Start with a sharp tool—dull tools cause rough finishes. Lower the feed rate (try reducing by 10–20%). Use a light depth of cut for finishing passes. Apply coolant to reduce friction. Switching from dry machining to coolant can improve finish from 125 RMS to 63 RMS on aluminum.
What is built-up edge (BUE) and how do I prevent it?
BUE is a clump of material stuck to the tool tip caused by low cutting speed or sticky materials (like aluminum). It scratches the workpiece, reduces tool life, and ruins precision. Prevent it by increasing cutting speed, using sharp tools, and applying coolant.
What is the most important factor for achieving precision in machining?
Machine stiffness and workholding quality are critical. A rigid machine resists bending under cutting forces, reducing vibration. Quality workholding (chucks, vises, fixtures) secures the workpiece without movement. Together, they enable consistent accuracy. For most applications, ±0.002 inches/ft accuracy is sufficient; aerospace requires ±0.0005 inches/ft.
Contact Yigu Technology for Custom Manufacturing
At Yigu Technology, we specialize in mechanical machining for precision components. Our capabilities include turning, milling, drilling, boring, reaming, and tapping. We work with metals (aluminum, steel, titanium, stainless steel), plastics, and composites.
From automotive parts to industrial components, we deliver precision that meets your specifications. Our quality control ensures consistent results across production runs.
Contact us today to discuss your machining project. Let our expertise help you achieve the precision, quality, and reliability your application demands.