Introduction
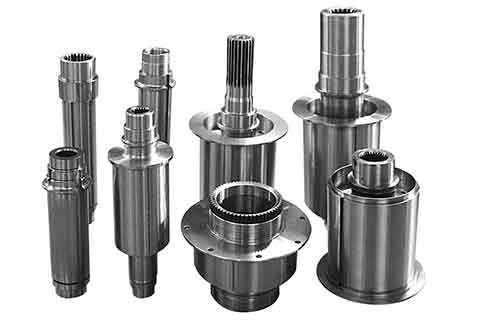
A machined shaft appears simple—a cylindrical piece of metal. Yet this unassuming component is the backbone of countless mechanical systems. From high-speed industrial spindles to precision aerospace actuators, shaft performance determines system reliability. A failure here can cause vibration, bearing wear, or catastrophic breakdown.
Engineering a high-performance shaft requires more than turning a bar to a specified diameter. It demands careful material selection, precise machining to exacting tolerances, controlled heat treatment, and rigorous geometric verification. Each decision affects how the shaft integrates with bearings, seals, gears, and other components.
This guide provides a detailed engineering roadmap. You will learn how to select materials for specific environments, understand the critical relationship between surface finish and bearing life, manage tolerance stacks across multiple features, and verify runout and cylindricity. For design engineers and procurement specialists, this knowledge ensures the shafts you source are not just parts—they are reliable system enablers.
What Defines a Precision-Machined Shaft?
Beyond the Basic Cylindrical Shape
A precision-machined shaft is distinguished from a simple turned bar by its adherence to functional specifications. These specifications ensure predictable performance in an assembly.
Key defining characteristics:
| Characteristic | Description | Why It Matters |
|---|---|---|
| Geometric accuracy | Diameter tolerances, true position of features, cylindricity, straightness | Determines fit with bearings, seals, and mating components |
| Surface integrity | Surface finish (Ra value), absence of micro-cracks or tears | Affects friction, wear, and fatigue life |
| Metallurgical consistency | Uniform grain structure and hardness throughout | Ensures predictable strength and fatigue behavior |
| Dimensional stability | Maintains geometry under operational loads and temperatures | Prevents distortion during service |
Example: A shaft for a high-speed packaging machine is not just a “25 mm steel rod.” It is a component defined by: 60 HRC hardness on bearing journals, 0.4 μm Ra surface finish on those journals, total indicated runout (TIR) less than 0.01 mm across its length, and stress-relieved condition to prevent deformation over time.
Which Materials Suit Different Operating Environments?
Matching Material to Load and Environment
Material selection is the first defense against operational failure. The choice balances strength, weight, environmental resistance, and cost.
| Environment & Load Case | Recommended Material Families | Key Properties | Example Application |
|---|---|---|---|
| High-speed, high-stress | Case-hardening steels (8620, 9310), through-hardening steels (4340, 4140) | Tough core, hard wear-resistant surface; good fatigue strength | Gearbox shafts, turbine engine drives |
| Corrosive/wet | Austenitic stainless (316, 304), duplex stainless (2205), nickel alloys (Monel, Inconel) | Pitting and crevice corrosion resistance; passivation forms protective oxide layer | Pump shafts, marine propeller shafts, food processing mixers |
| Lightweight, high-stiffness | High-strength aluminum (7075-T6), titanium alloys (Ti-6Al-4V) | Exceptional strength-to-weight ratio; titanium also offers corrosion resistance | Aircraft control linkages, robotic arm axles |
| Non-magnetic, wear-resistant | Precipitation-hardening stainless (17-4 PH), tool steels (D2) | 17-4 PH remains non-magnetic; D2 offers very high wear resistance | MRI machine components, precision instrument shafts |
Case Study: Solving a Fatigue Failure
A manufacturer of industrial centrifugal pumps experienced repeated failures of a stainless steel 304 shaft at the impeller keyway. Analysis revealed chloride-induced stress corrosion cracking.
The solution was not simply a stronger material, but a more corrosion-resistant one. The shaft was re-specified in duplex stainless steel 2205. While more expensive initially, its superior chloride resistance and higher yield strength increased service life by over 400%, eliminating unplanned downtime.
How Critical Is Surface Finish for Bearing Interfaces?
The Mechanics of Wear
Surface finish at bearing journals is arguably the most important factor for bearing life—more critical than a marginally tighter diameter tolerance.
A rough surface (e.g., 1.6 μm Ra) has sharp asperities that act as microscopic cutting tools against the bearing race. This causes:
- Abrasive wear
- Heat generation
- Metallic debris that contaminates lubricant
- Accelerated failure
Optimal Finish Range
For rolling element bearings (ball, roller), a surface finish of 0.2 μm to 0.8 μm Ra is typically specified. This range promotes formation of a stable elastohydrodynamic (EHD) lubrication film that separates surfaces and minimizes metal-to-metal contact.
Data point: Studies show that improving a bearing journal’s surface finish from 1.2 μm Ra to 0.4 μm Ra can increase calculated fatigue life (L10 life) by 25–50% —a significant return on a relatively small manufacturing improvement.
Surface Texture Direction
The direction of machining marks—the lay—matters. A circumferential lay (tool marks running around the shaft) is ideal for bearing journals. It helps retain lubricant and does not create leakage paths like an axial lay would.
How Tight Must Tolerances Be? Understanding Stack-Ups
Applying GD&T to Control Relationships
A shaft is an assembly of features: bearing journals, seal diameters, shoulders, threads, keyways. The tolerance stack-up defines how allowable variation in each feature accumulates to affect final assembly function.
Critical principle: Not all tolerances are equal. Apply Geometric Dimensioning and Tolerancing (GD&T) to control relationships, not just sizes.
| Feature | Typical Control | Why It Matters |
|---|---|---|
| Bearing journal diameter | Tight size tolerance (e.g., g6 or h6) | Achieves correct interference or clearance with bearing inner ring |
| Journal-to-journal alignment | Runout or concentricity (<0.02 mm TIR) | Ensures bearings are aligned; prevents preload and premature wear |
| Shoulder squareness | Perpendicularity to datum axis | Ensures bearing sits flat; loads remain axial |
| Non-critical features | Looser tolerances (±0.1 mm) | Reduces cost without affecting function |
Example: A shaft with nominal diameter 25 mm might specify Ø25h6 (-0/-0.013 mm) for bearing journals. This defines the fit with the bearing precisely.
What Is the Typical Machining Sequence?
A Disciplined Process for Accuracy and Stress Management
A well-planned sequence is essential for maintaining accuracy and managing stress. Here is a typical sequence for a hardened steel shaft.
| Step | Operation | Purpose |
|---|---|---|
| 1 | Rough turning | Removes bulk material; leaves ~0.5–1.0 mm stock per side |
| 2 | Stress relieving (optional) | Low-temperature heat treatment to relieve machining stresses; minimizes distortion |
| 3 | Semi-finish turning/milling | Machines features closer to final; leaves ~0.1–0.2 mm for grinding |
| 4 | Heat treatment (hardening & tempering) | Achieves final core strength and surface hardness |
| 5 | Centerless or cylindrical grinding | Primary finishing; achieves final diameter, surface finish, and cylindricity |
| 6 | Superfinishing/honing (optional) | Improves finish to <0.1 μm Ra; creates beneficial cross-hatch pattern for oil retention |
Grinding considerations:
- Centerless grinding: Efficient for straight diameters
- Cylindrical grinding (between centers): Used for shafts with multiple diameters, tapers, or tight geometric tolerances
How Do You Control Heat Treatment Distortion?
Managing the Leading Cause of Warpage
Heat treatment is essential for performance but is the leading cause of distortion. Controlling it requires a proactive strategy.
Common sequence: Austenitizing (heating to critical temperature) → Quenching (rapid cooling) → Tempering (re-heating to relieve brittleness)
Distortion causes:
- Non-uniform heating or cooling
- Non-homogeneous material
- Release of pre-existing machining stresses
Control Methods
| Method | Application |
|---|---|
| Symmetrical design | Avoids one-sided heavy sections; promotes even heat distribution |
| Stress relief before hardening | Performed after rough machining; most effective way to reduce final distortion |
| Fixturing during treatment | Vertical orientation or special racks prevents sagging in long, slender shafts |
| Alternative processes | Induction hardening or nitriding hardens only surface layer; drastically reduces distortion |
Data point: A nitrided shaft may grow only 5–10 microns and can often be finished before treatment, eliminating post-heat-treatment grinding operations.
How Do You Verify Runout and Cylindricity?
Ensuring Geometric Conformance
Verification ensures the manufactured shaft meets drawing callouts. Different methods suit different production contexts.
| Method | Best For | Capability |
|---|---|---|
| V-blocks and dial indicator | Quick shop-floor checks | Measures total indicated runout (TIR); limited form assessment |
| Cylindrical grinder with in-process gauge | Immediate correction during grinding | Checks concentricity between features directly on machine |
| Coordinate measuring machine (CMM) | Complete geometric verification | Measures diameters, lengths, cylindricity, straightness; provides documented report |
| Air gauging / plug gauges | High-volume production | Rapid pass/fail inspection for tight diameter tolerances |
Key point: Runout is measured by rotating the shaft and observing indicator movement. For critical shafts, total indicated runout (TIR) is often specified—the total variation as the part rotates one full revolution.
What Assembly Considerations Matter?
Keyways, Threads, and Press Fits
Shaft design must facilitate reliable assembly with other components. The most common failure points are often at these interfaces.
Keyways:
- Use full-radius (bullnose) end mills to eliminate sharp corners—crack initiation sites
- Specify fine surface finish
- Typical width tolerance: JS9 to allow key to slide without excessive play
Threads:
- Machine a relief groove before thread run-out to allow tool clearance
- Ensure nut seats flat against shoulder
- Thread must be concentric with bearing journals to avoid induced runout
Press fits (interference fits):
- Interference typically 0.02–0.05 mm per 25 mm of diameter
- Calculated based on materials and required torque transmission
- Include generous lead-in chamfer at entry to guide component and prevent shearing
Yigu Technology’s Perspective
At Yigu Technology, we specialize in engineering and manufacturing mission-critical machined shafts. We understand that a shaft is the backbone of a rotating assembly—its quality dictates system performance and reliability.
Our capabilities:
- Materials: Stress-proof steel, stainless alloys, titanium, Inconel, aluminum
- Machining: CNC turning, cylindrical grinding, centerless grinding, milling
- Heat treatment: In-house controlled processes including stress relieving, hardening, nitriding
- Verification: CMM inspection, surface finish analysis, runout measurement
Recent project: A pump manufacturer needed shafts for corrosive chemical service. Previous stainless 304 shafts failed within 6 months due to pitting corrosion. We recommended duplex 2205, machined with precise bearing journal finishes (Ra 0.4 μm), and verified cylindricity to 0.008 mm. Service life exceeded 3 years—a 500% improvement—with no corrosion-related failures.
We believe successful shaft engineering requires collaboration. Our team works with clients early in design to optimize material selection, tolerance allocation, and manufacturing sequence. The result is a shaft that integrates seamlessly and performs reliably.
Conclusion
Engineering a high-performance machined shaft is a holistic process. It begins with material selection tailored to the operating environment. It proceeds through a meticulously planned machining sequence that respects material behavior. Applying GD&T principles controls feature relationships. Specifying critical surface finishes ensures bearing life. Controlling heat treatment distortion prevents warpage.
Rigorous verification—using CMMs, runout measurement, and surface analysis—provides assurance that the shaft meets specifications. The assembly interface features—keyways, threads, press fits—require equal attention to prevent failure points.
By mastering these interconnected disciplines, you move from ordering a simple cylindrical part to specifying a precision-engineered system component. The result: durability, efficiency, and reliable operation.
FAQ
What is the difference between hardness and toughness in a shaft material, and why does it matter?
Hardness is the material’s resistance to surface indentation or abrasion (measured in HRC, Brinell). It is critical for wear resistance at bearing journals. Toughness is the material’s ability to absorb energy and deform without fracturing—resistance to impact. A shaft needs a hard surface for wear but a tough core to withstand shock loads and torsional stresses. Case hardening achieves this dual property: a hard case over a tough core.
How do you specify a shaft for use with a lip seal?
The seal running surface requires: 1) Fine surface finish, typically 0.2–0.8 μm Ra, to minimize seal wear. 2) Hardness typically >30 HRC to resist abrasion. 3) A lead-in chamfer to guide the seal during assembly. 4) Tight diameter tolerance to ensure correct interference with the seal’s ID. Some applications use a spiral-grooved or coated surface to pump lubricant back inward.
What causes a machined shaft to warp or bend after machining?
Post-machining distortion is almost always caused by release of residual stresses. These stresses are locked into the material from original bar stock rolling and are unevenly redistributed as material is removed. When the part is unclamped, it moves to find a new stress equilibrium. The solution: use stress-relieved or cold-drawn material and incorporate stress relief heat treatment after rough machining.
When is grinding required versus just turning on a lathe?
CNC turning is sufficient for most non-hardened materials (aluminum, mild steel) and can achieve good finishes (~0.8 μm Ra) and tolerances (±0.025 mm). Grinding is required when: 1) Material is hardened (>45 HRC) and cannot be cut with normal tools. 2) Tolerances are tighter than ±0.01 mm or surface finishes finer than 0.4 μm Ra. 3) Superior geometric form (cylindricity, straightness) is needed. Grinding is a finishing process that follows turning and heat treatment.
How do you verify that a shaft meets concentricity requirements?
Concentricity (or runout) is verified by rotating the shaft on precision centers or V-blocks and measuring with a dial indicator. The total indicated runout (TIR) is the maximum variation. For high precision, coordinate measuring machines (CMMs) capture hundreds of data points to mathematically determine concentricity and cylindricity relative to established datum axes.
Contact Yigu Technology for Custom Manufacturing
Don’t leave the performance of your rotating equipment to chance. Yigu Technology delivers shafts engineered to precision, built for durability, and validated for reliability.
- Materials: Stress-proof steel, stainless alloys, titanium, Inconel, aluminum
- Capabilities: CNC turning, cylindrical grinding, centerless grinding, milling, heat treatment
- Quality: In-house CMM inspection, surface finish analysis, runout measurement
- Certifications: ISO 9001
Contact our engineering team to discuss your specific shaft application. We will provide material recommendations, DFM feedback, and a manufacturing plan optimized for your performance requirements. Partner with us for shafts that perform reliably—the first time, every time.
